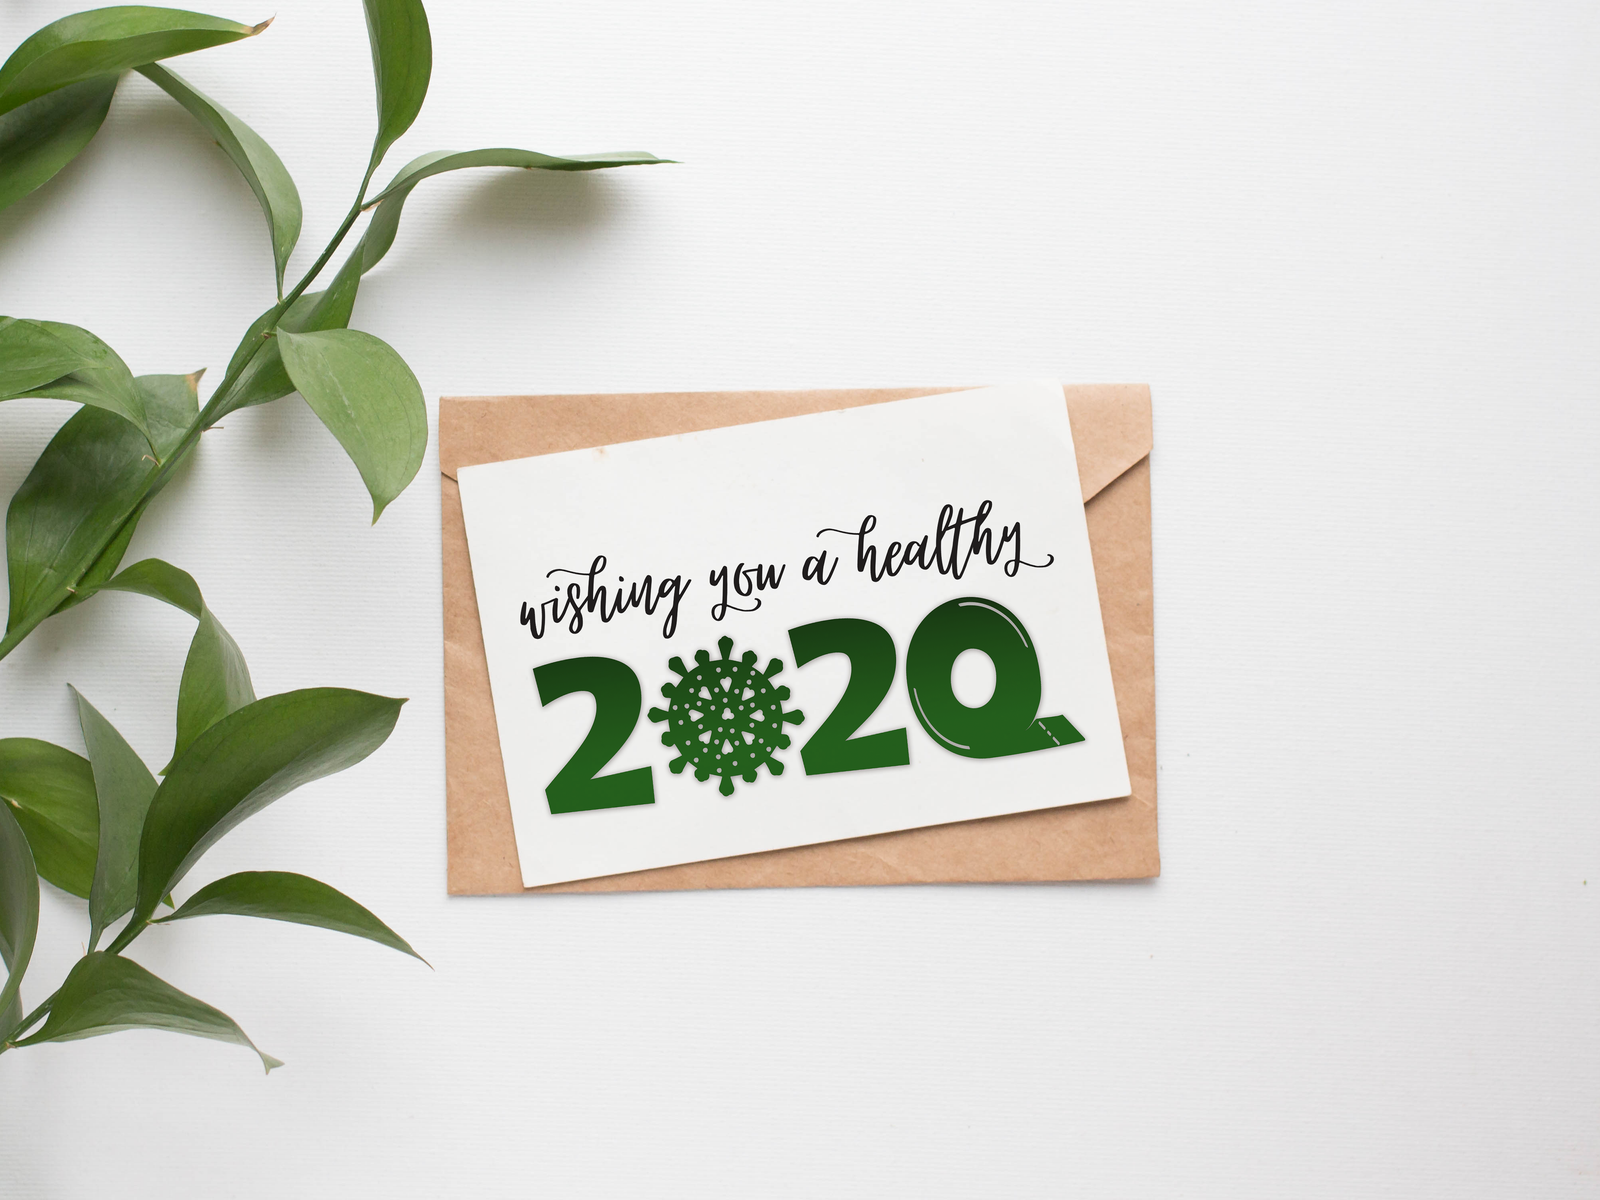
Please enjoy this COVID-19 Coronavirus 2020 SVG file. I designed the virus icon from a diagram of the actual virus cell. (I’m not sure if cell is the technically correct word here, but it has been a while since I was in Biology class!)
Health is so important to the daily enjoyment of our lives. This Coronavirus outbreak has hit our world so very very hard. I sincerely hope that you and yours are doing well and are well provided for.
With mostly everyone at home, I thought it might be enjoyable to send out cards to those you love to let them know you are thinking of them. That was the inspiration for this card. It is intended as a little bit of humor in the midst of a scary time.
Wishing you well. Here is the Coronavirus 2020 COVID-19 SVG FREEBIE!
So, the world has gone mad. I mean, doesn’t it feel almost surreal?
A world wide pandemic is something I thought I would only see in movies and board games. It really never occurred to me that it would actually be something to touch and even deeply affect my day to day life.
First, Here is to hoping that this finds you and yours safe and well supplied for all your needs. Our family is stocked for a couple weeks and ready to hunker down. My girls and I are not especially vulnerable to the virus, thankfully, but my husband does not have a strong immune system.
All anyone can do is be prepared and pray!
So, how are things in your neck of the woods? Lots of hand-washing here and we have enough toilet paper and soap too! 😉
Hopefully, these couple SVG files will be a welcome diversion for you.
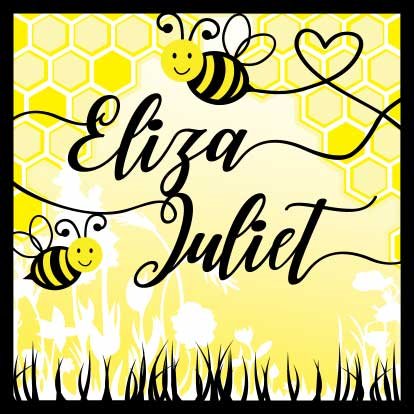
Layered Bee File Posted on Etsy
If you happened to catch my last post, you saw that I created an adorable layered bumble bee file. I used it as a baby shower gift, but I have had at least two people purchase it for a beekeeper they know.
Anyhow, I did polish up the file and get it posted on Etsy. You have to add your own text, but the rest is ready to cut!
Since we all have our family and their well-being on our minds, I thought a quick couple files for Mom and Dad would be perfect. Mother’s Day and Father’s day aren’t too far away. Get your cards done early.
While I envision these as layered card fronts, but you could definitely do more with them.
Here are some of my past posts on Father’s Day Cards and Files.
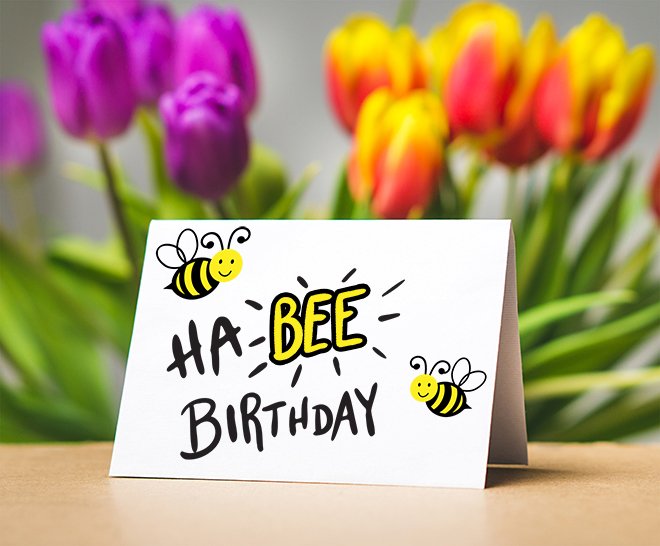
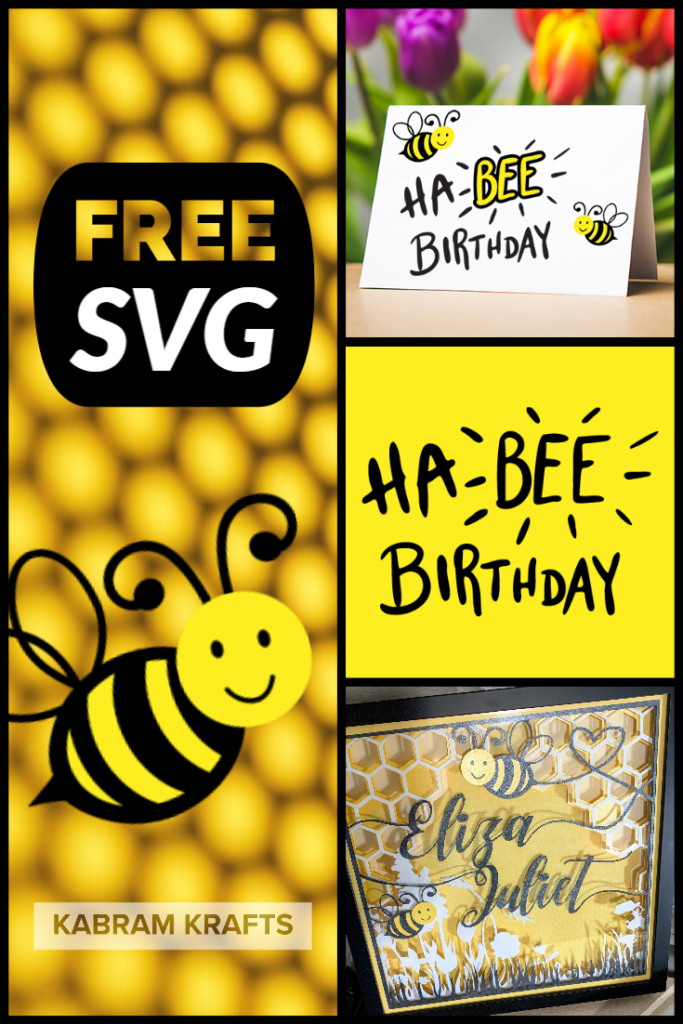
I have a free Bee SVG for you tonight. Looking at this smiling bee is definitely cheering me up a bit. While I am glad to be back here posting a new file for everyone, it has been a rough week here my neighborhood.
It has been so heavy on my heart, especially having to share the news with my young daughters. They are so sweet though, and they were reassuring me that she was not dead, but alive with God in heaven. Such sweet little hearts children often have.
BEE Layered Paper Art
Anyhow, if you need a little cheering up after such a heavy topic, I have just the file for you tonight. I made this cute little bee for a gift a few weeks ago. It was my first attempt at a layered paper art picture.
Actually, this is how the layered file looked in Adobe Illustrator before I cut it out.
Not that I like to brag, but I do really love how it turned out. Hopefully the recipient did too!
If there is enough interest, I may put the layered file up for sale on my Etsy Shop, but for now I wanted to share the cute little bee. Before I can put it up for sale, I will need to write up instructions and figure out how to make the name layer more customizable.
UPDATE
I managed to get the layered file cleaned up and posted on Etsy! Find it HERE.
The one thing I would change were I to make it again is to put a little more support behind the middle of the name layer as it was a wee bit wobbly.
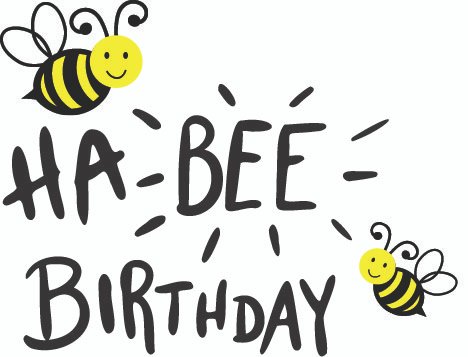
Free BEE SVG and hand-lettered sentiment
Also, because I felt the little bee was lacking something, I hand-lettered a cute birthday message to go with it. Hopefully you enjoy it and are able to make something adorable with it.
I also have some other cute animal files if you want to take a look.
If you are curious, I separated the layers in my picture using cork scraps. I use cork for the backs of the coasters I have on my Etsy Shop, and always have lots of scraps left over. They turned out to be just perfect for the job. Here are some behind the scenes photos of this project.
Well, I sincerely hope you have a wonderful week. BEE happy, and enjoy life.
Tomorrow is February – time for floral hearts! Can you believe that the first month of 2020 has already come and gone? Time always flies, and yet I am still always surprised by it.
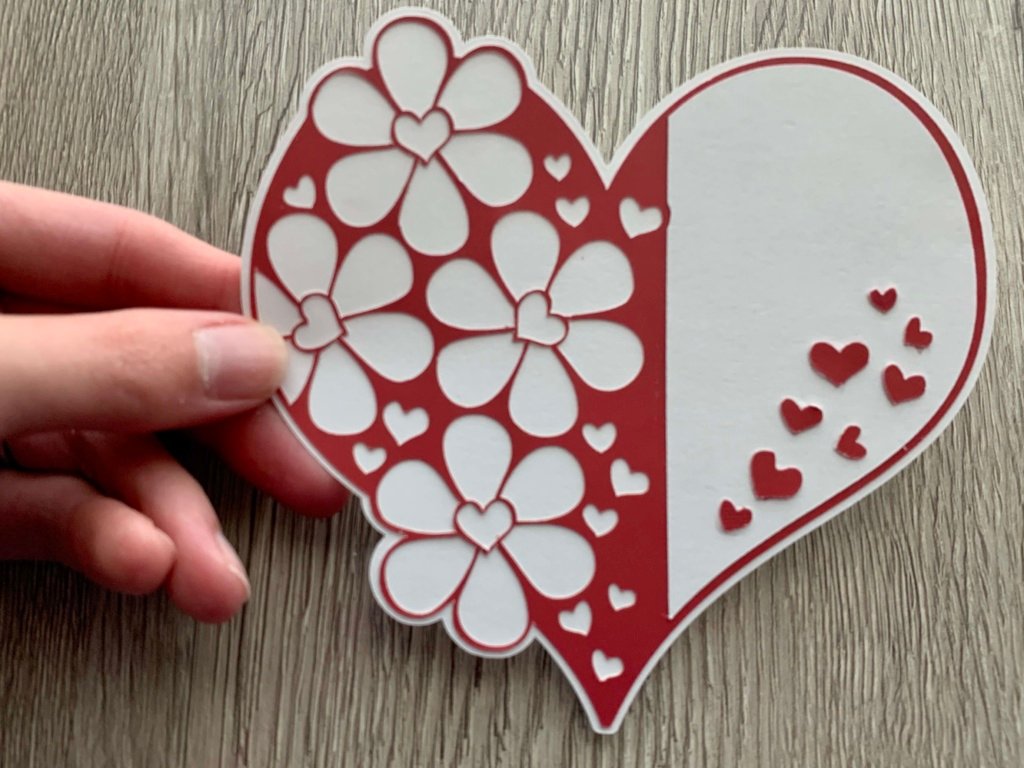
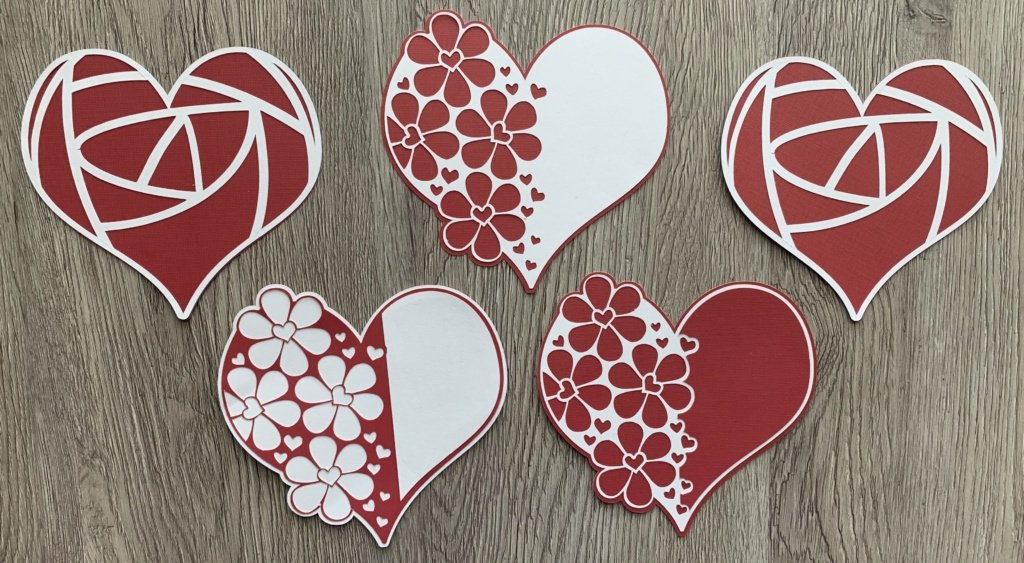
In a new twist, I am actually ahead of the holidays in my crafting adventures. I have been working on more Valentine’s day files because they are just so much fun. Of course, there must be hearts and flowers and floral hearts. So, why not hearts with flowers made with a heart?
However, I need inspiration from you! Once I design and cut a file, I don’t always know the best ways to use it. If you use these files, show me please! They could make adorable cards by themselves, but there has got to be something else more creative to do with them. I just don’t know!
Well, I am not totally out of inspiration. They would look good as decals on things. I know, because I made some mock ups on some nifty little mock up freebies I found. Definitely not because I made cups with floral heart decals on them. That would be waaaay tooo ambitious. Maybe tomorrow. Probably not.
Now, I ought to go and make a good pinterest image. Did y’all know that this blogging thing is way too complicated? Can’t I just drop a free file here and call it a day. Apparently not. That wouldn’t be cool. Social media would never find me. I would be in the internet void forever. Yep. Technology is awesome. Technology is lame.
Well, did anyone catch my ‘y’all’? I am living in Texas after all now. However, it definitely does not roll right off the tongue yet and it makes me feel a bit like an impostor.
Anyhow, here is the file. Please enjoy. Hopefully you didn’t read all my text prelude, because I am sure it is lacking in wit and sophistication.
Pretty Pop-Up Hearts Happy Valentine’s Day! Time for a new file. This one, as you may notice, is a paper-cutting pop-up file for all you card makers out there! Sadly, my poor… Read more: Paper Cut Pop-Up Heart SVG Template
I have been working on more Valentine’s day files because they are just so much fun. Of course, there must be hearts and flowers and floral hearts. So, why not hearts with flowers made with a heart?
Love is Patient, Love is Kind. Valentine’s Day is nearly here! Do you need some SVG heart borders? Because it is already February! If you recall, I was hoping to be back… Read more: Heart Border SVG Files for Valentine’s Day
Easy DIY Valentine’s Day Card Made with Minimal Supplies – kwernerdesign blog Happy Valentine’s Day! Do you want to make your own DIY Valentine’s Day Card? Well, Valentine’s Day is approaching rapidly!… Read more: 9 DIY Valentine’s Cards to Inspire You Today
Love February is almost upon us. Looking through all the ideas I have found on cutting files to make, I stumbled upon this lovely little kirigami card. Now, I don’t know where… Read more: Love Card FREE SVG Cutting File Download
February is almost upon us! I have had a long hiatus from this blog in these winter months, but I have really been wanting to post more free files and inspiring projects… Read more: Happy Valentine’s Day – A free SVG sentiment
I’m just now getting around to posting these little projects I made. One was a (very) belated Christmas gift for my parents and the other was first Valentine for my husband from… Read more: Hearts and Handprints
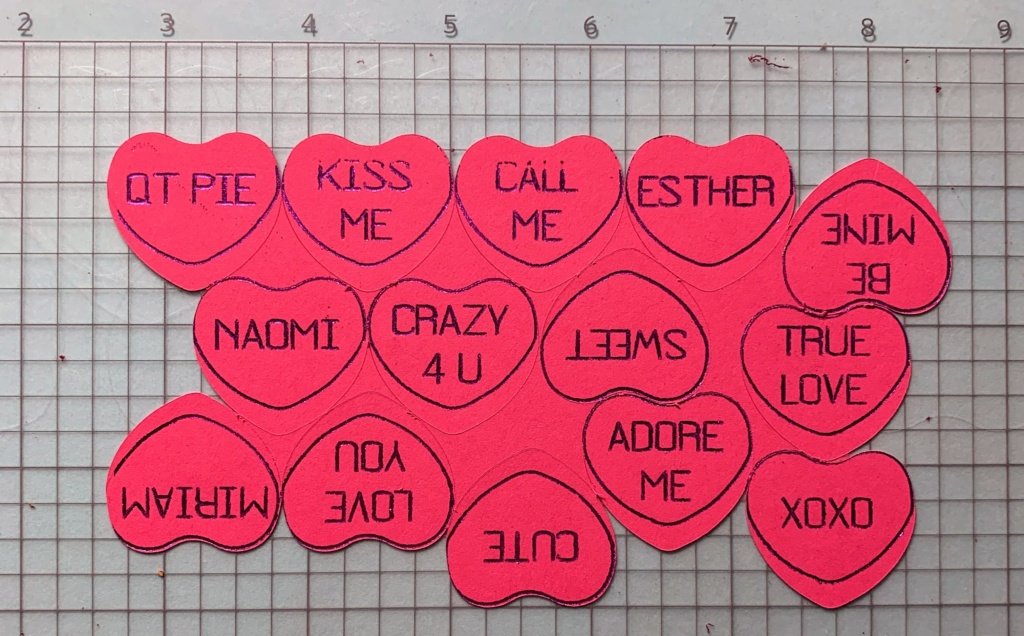
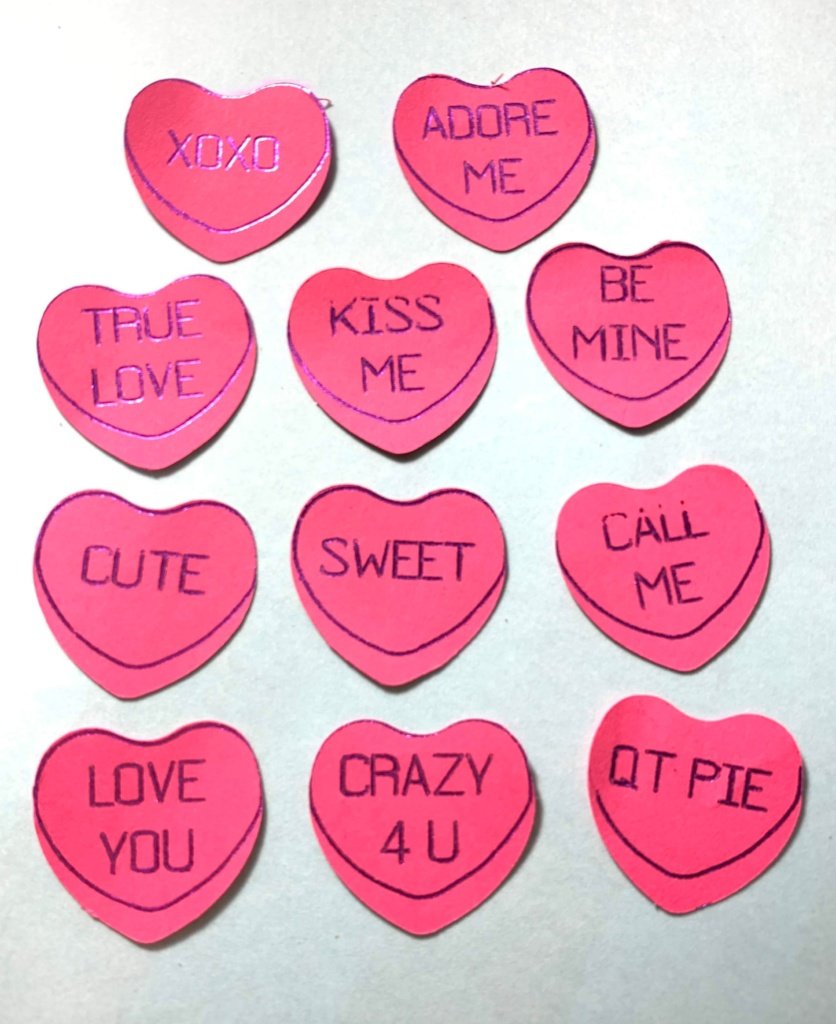
As promised, I am back with a new version of the Valentine’s Day Candy Heart SVG freebies I shared last week. If you missed that one, be sure to check it out and grab the free layered SVG file I shared.
My health is on the mend thanks to some powerful antibiotics. However, I am still mostly deaf in one ear thanks to an ear infection. My sympathies to those who have frequent ear infections or actual hearing loss!
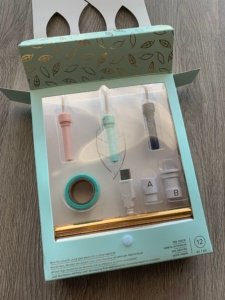
The Dreaded Foil Quill
Well, dreaded might be a bit exaggerated, but I got this fun tool AT LEAST 6 months ago. It has been sitting unopened in my closet. Why? Because I was intimidated by it. While I may have used the excuse of not having time, I truly was worried that I would mess it up and waste all that pretty foil sitting there waiting for me.
If you are in the same boat, pull it out and just try it. Well, if you have the right cords. First, I summoned my courage and attempted to plug it in, but the cord on this thing is only two feet long and needs to be plugged into a USB power port. (The one on the Cameo does not do the job). So, I paid a visit to Amazon and purchased one of these little USB Extension Cords.
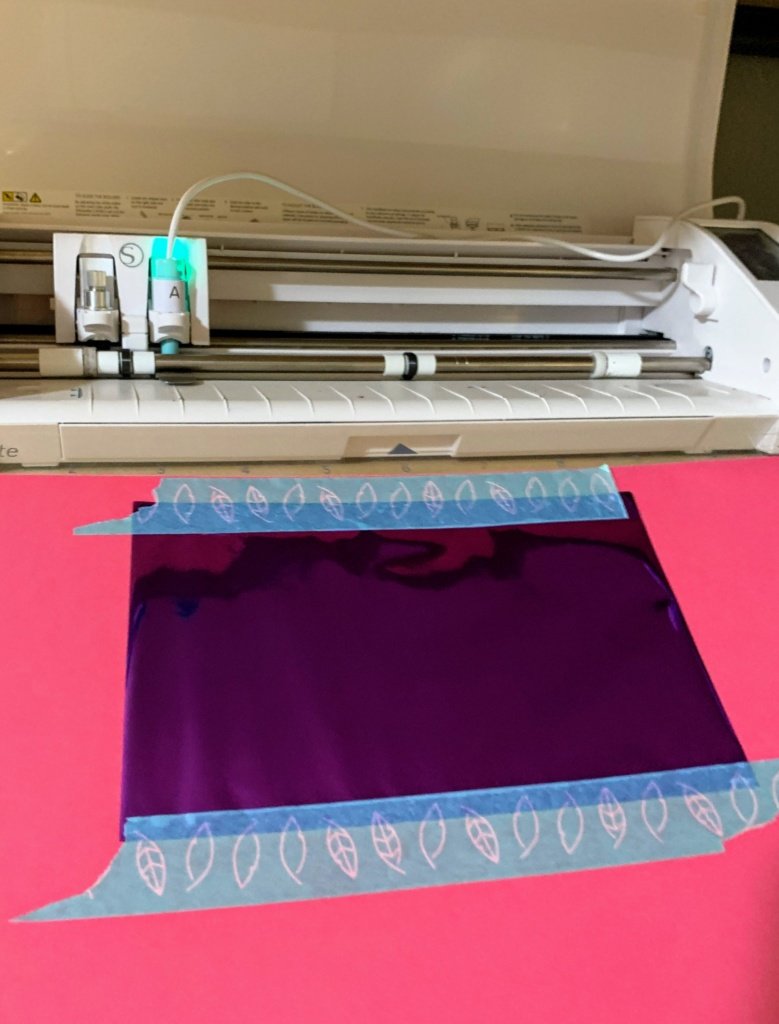
All set up and ready to foil.
Once I got my extension cord, I was finally ready. After modifying the file, which I will link to at the end, I was ready to try it out. Not knowing how the Foil Quill would work in the Cameo 4, I put it in the second slot of my Cameo 3 and my cutting blade in the first slot.
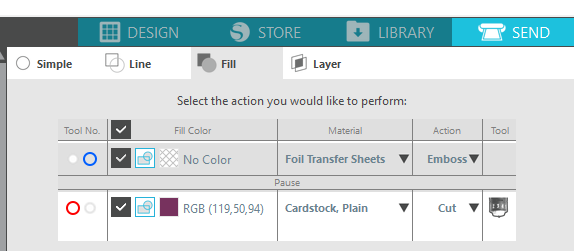
While I am no expert in the foil quill as of yet, here is a screenshot of the settings I used, as they seem to have worked quite well! Make sure you select the correct tool for each part and add a Pause between the tools so you can remove the foil.
ATTENTION: Add a pause between the foil and the cardstock cutting!
An important thing to note is that I put a PAUSE between the Foill Quill and the cutting job so that I could remove the foil before it tried to cut the hearts. This actually worked out really well. I was able to remove the foil with a bit of maneuvering without unloading the mat. Then, I simply pressed continue on my computer and it cut the foiled hearts out.
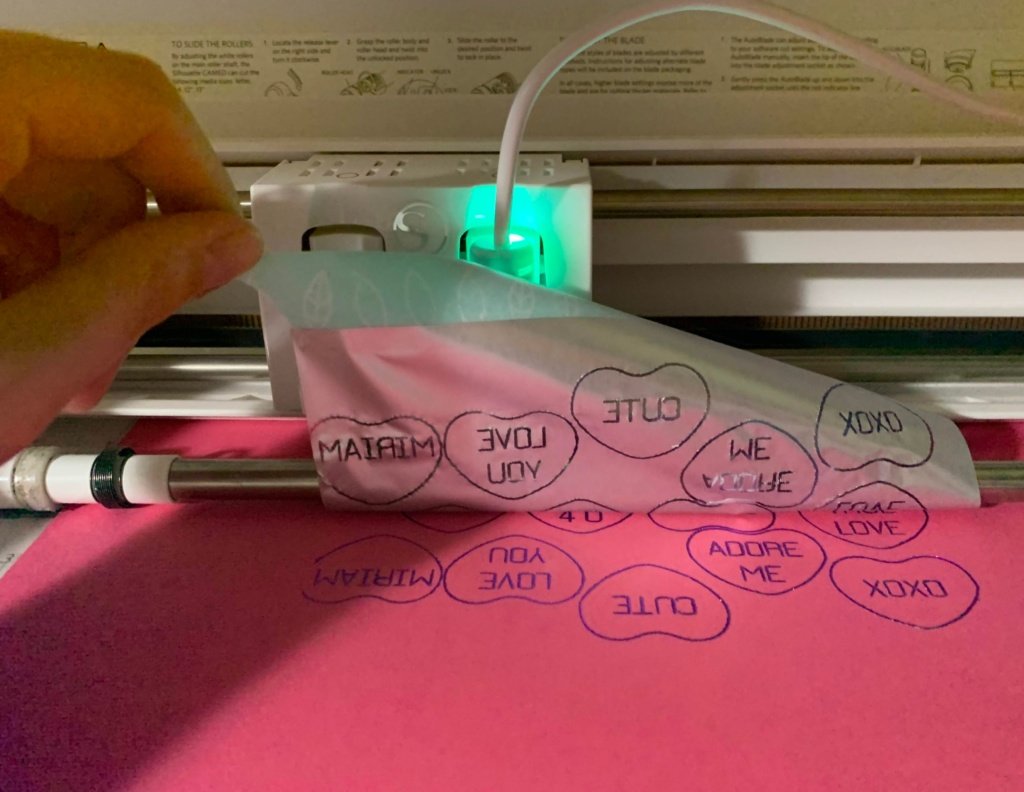
Step 1: Let the Foiling Begin
Checking to see how it came out was the best part. It worked (almost) perfectly. The only issue I had was on not aligning my design and the foil quite exactly. If you look in the image below, a couple of the hearts got a bit cut off in the foiling process. However, I was still happy with the results.
The exciting part!
Step 2: Cut the hearts.
After removing the foiling, I hit continue – it shows up as a button on your computer screen. My Cameo completed the job and cut out the cardstock.
Foil Quill Candy Hearts – Tada!
Foil Quill Card stock Hearts
For the font, I used “LW Tall Sketch” from the Silhouette Store. It is a nice skinny font that looks great in all caps and didn’t have space between the inner and outer edge of the letters.
If you wanted to enhance the 3-D effect of the candy heart, you could shade in the bottom half of each heart with the same color pencil or marker.
Last Tips
Moral of the story, don’t fear the foil quill. It is your friend. The foil quill won’t hurt you (probably); it is hot. Follow the directions and heat it up for 5 minutes or so before you start.
Now, what should I do with these? I feel as though some of you clever card makers could do something really neat with them. I am envisioning some sort of see through container on the front of the card with these inside. Or maybe just a line of them on the front of the card. Who knows? Once I have designed them, my creative juices run out. So, I always love to see what my readers come up with. Drop me a picture if you create something awesome!
Now, hopefully this download link will work. A final tip – cut by the line color or fill – there is a no fill and a fill.
Happy New Year everyone! This year has already had a rocky start in my house. Everyone was down and out with the flu. I got the flu shot. I got the flu. Is anyone else in that boat? Well I am sick. Sick of being sick. I had so many great and energetic ideas. Plans to watch fewer shows, do more crafts, write more blog posts, make more svg files, spend more quality time with my family. Instead, I have been on my back watching shows. Talk about demoralizing!
But now, I am back. Well, almost. I still have a cough that could wake the neighborhood and resulted in my husband giving me dirty looks at the movie theater for my inability to stop my coughing fits. But, my energy is mostly revived. Hooray for 2020!
Has anyone missed me?
So, I have a gut feeling about this one. My blog is not a household staple. No one has been clinging to the edge of their seat wondering where on earth Kristin at Kabram Krafts has disappeared to. If you have, I am enchanted.
The truth is, I have felt sooooo guilty that I haven’t been creating more files and crafts to share with you here. I have been crafting. But, more often than not you will find me trying to catch up on laundry, dishes, and the general chaos of having three young daughters!
In fact, one of my top resolutions this year is to grow this site. To fill it to the brim with lots of crafty ideas and files for you to try.
New Christmas Toys
Did you receive any fun crafty toys for Christmas? Well, I made sure I did. Am I the only one who bought themselves a Christmas gift, wrapped it and put it under the tree? I present to you, my new Silhouette Cameo 4.
So far, I haven’t really put its capabilities to the test, but all the testing for today’s file was done on my new Cameo and it worked like a champ.
Free Valentine’s Day Message Hearts
I have more variations in my head for these. Including trying out the Foil Quill to write the messages on them. Hence, I have titled this post “Part I” – so hold me to it, more on the horizon.
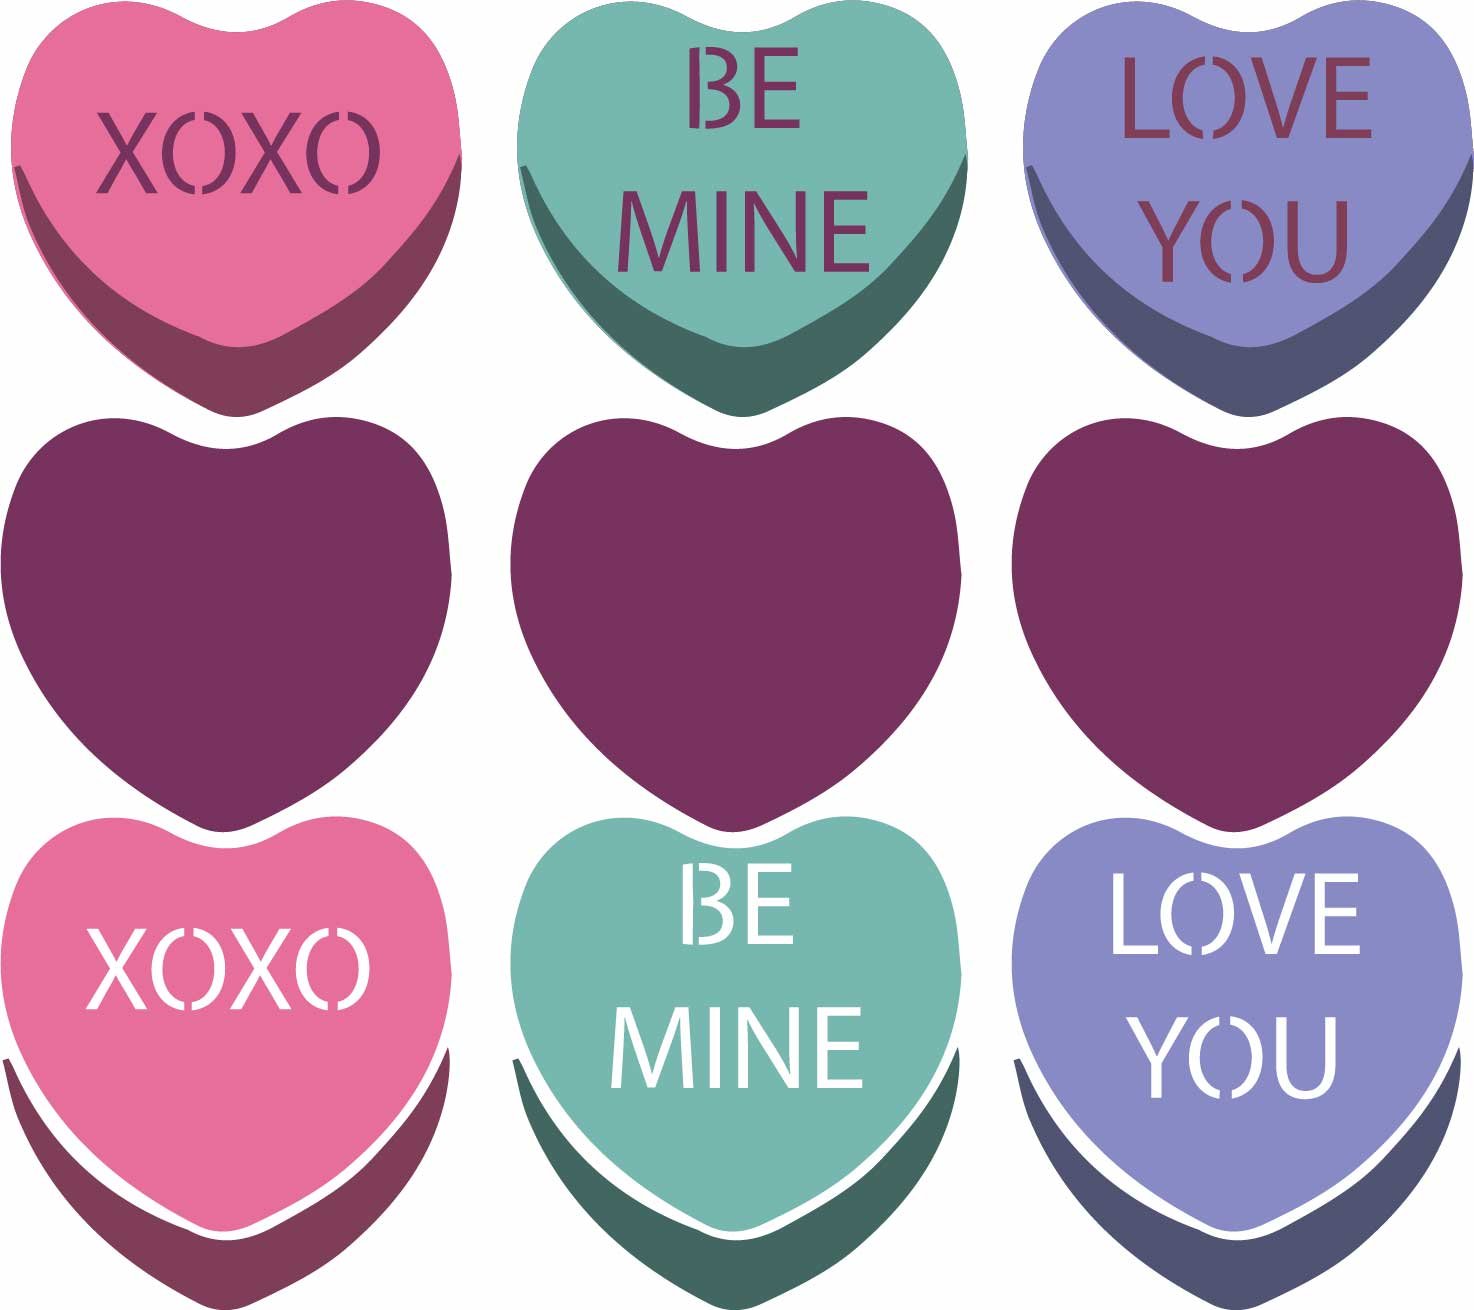
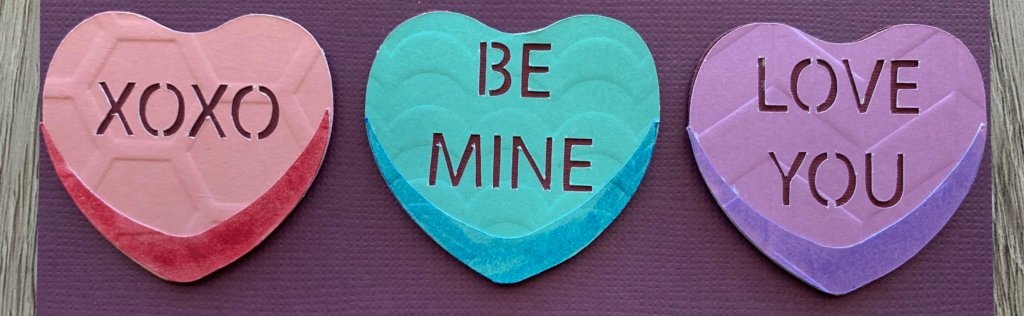
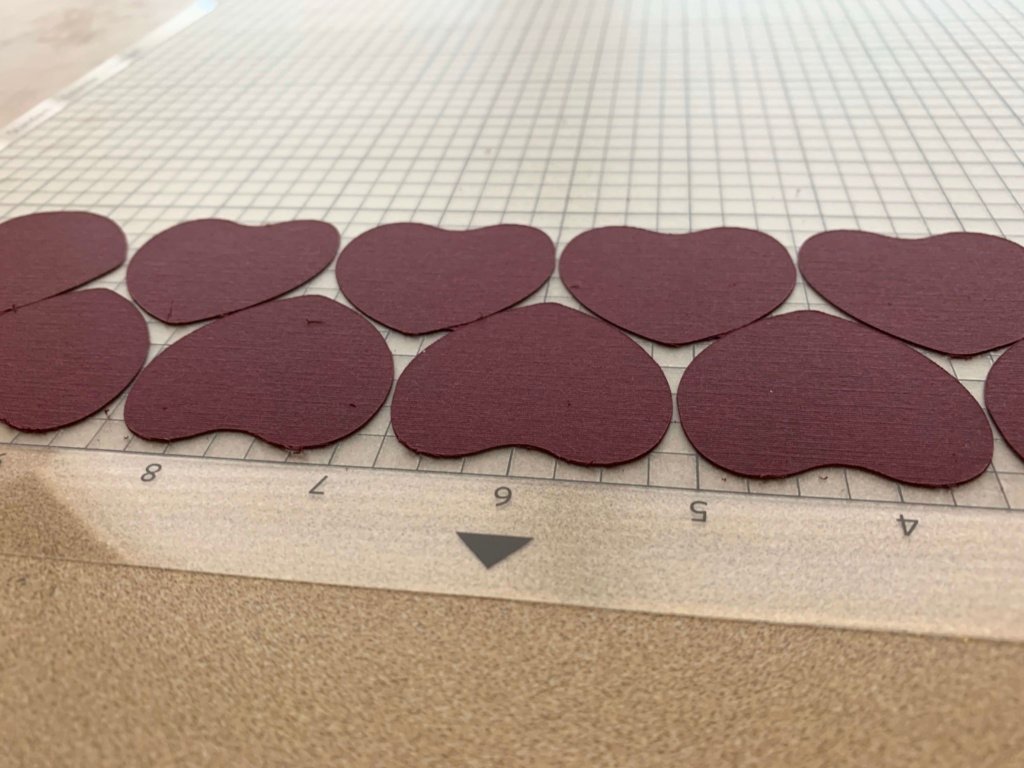
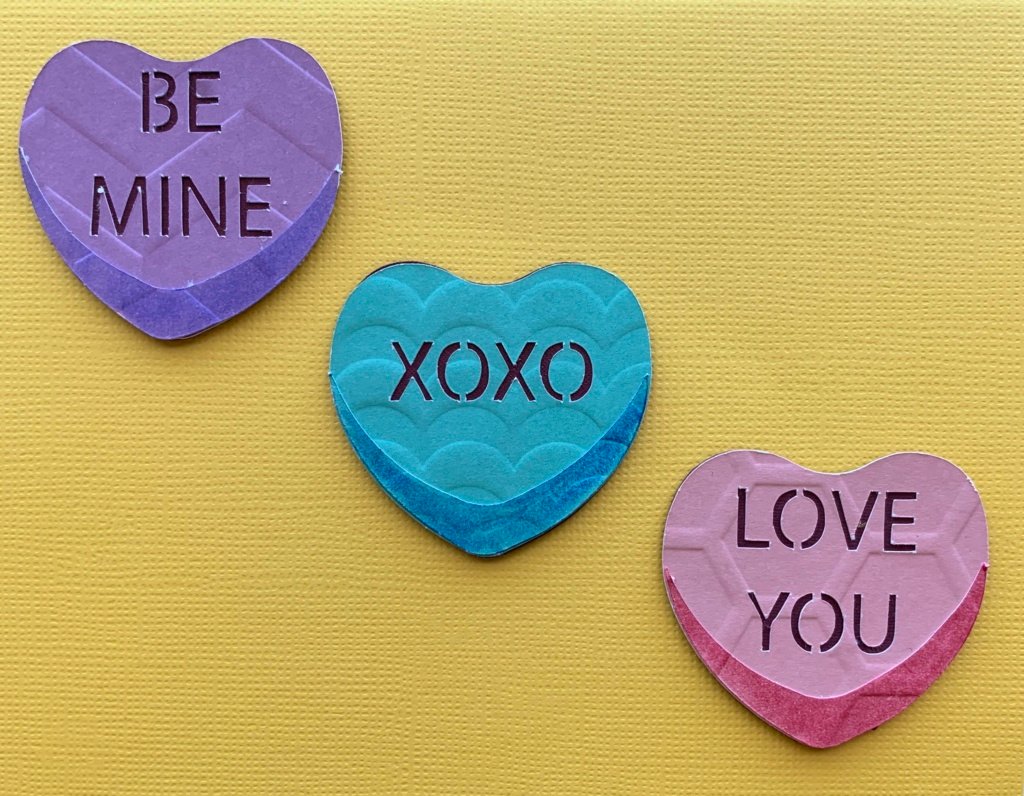
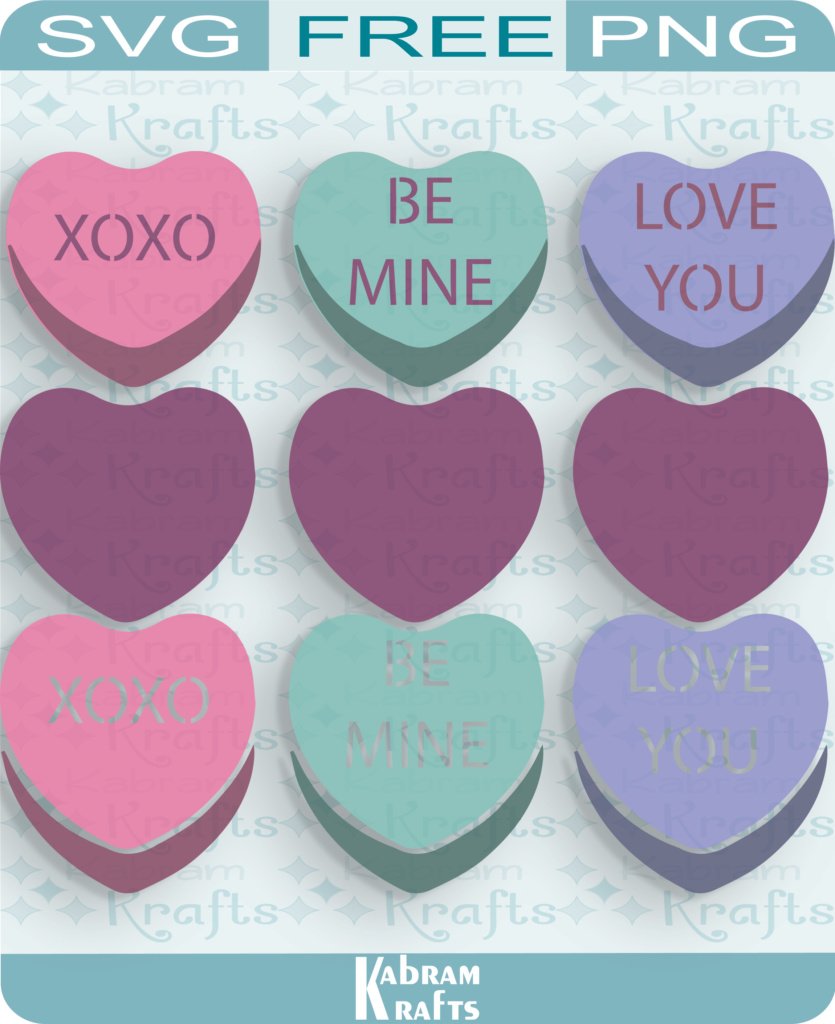
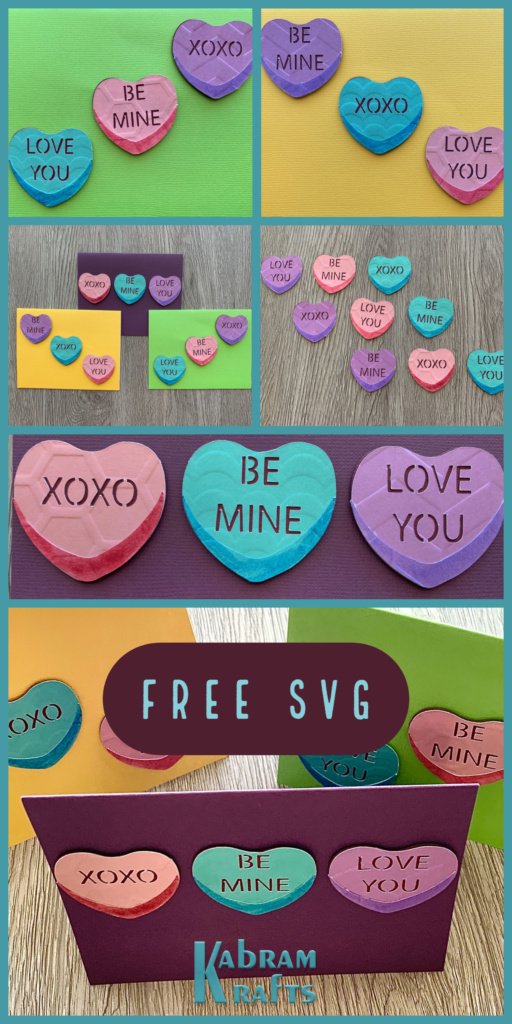
Here is what I came up with. These are three parts per heart. A backing for the text color, the heart with message, and the small shadow to make these look like the small message heart candies. So cute, and yet so very unappetizing. A Valentine’s Day staple. I choose three saying, but it would not be very hard to alter the messages if you know how the fun little path tools work.
For the shadow pieces, I colored each one with the same color to make it slightly darker. I think it might look just as good or better if you hand shade the heart with the words instead of adding the “shadow” paper piece.
Without further ado, here is the free Valentine’s Day message heart svg file freebie for you.
What do you do on the fourth of July? Growing up we often went to a park with a blanket to watch the fireworks. Or, sometimes, went to see the Rockies play and watch the fireworks afterwards. More recently, we have done nothing. Yep. Nothing.
To be fair, we have three young children (ages 5, 4, and 0). Whenever I feel like we never do anything, I have to remind myself that the time will come where things will be easier, maybe?
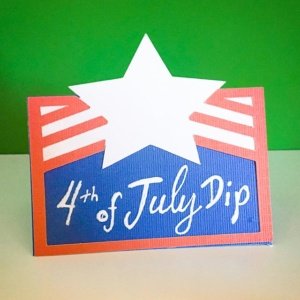
If, unlike me, you throw a grand party, I have some great files for you. The one below is one I made last year. They would be great place cards for a more formal gathering, or labels for your buffet!
Additionally, I have a new 4th of July svg file for you to download.
Now, if I had one of the laser cutting machines that look so amazing, I would be making myself some cute little lanterns with this file. Can you blame me, doesn’t it look amazing?!
I mean, wouldn’t it look great on the side of a little lantern with an LED candle inside? I suppose I could make it into a paper lantern…
What machine or machines do you use? I currently use the Silhouette Cameo 3. It has served me well and handles everything I have needed thus far.
However, I have heard that the Cricut Maker is amazing! Anyone have it? If I upgrade though, it may be in the fall when the new Silhouette 4 is set to come out. It is supposed to match or surpass the Maker and be cheaper!
As a side note, the singular of ‘fireworks’ does not roll off the tongue easily. I looked it up. It is ‘firework’ but was noted as ‘rarely used’ in the singular. Languages were my thing in college. And math. I like words and I suppose that make me a nerd. I am okay with that.
Well, anyway, I have a beautiful fireworks SVG for you today.
Is it just me, or is 2019 flying by? My baby girl is already 5 months old and Easter is almost here. I was just getting used to it being March, but now March is gone and Spring is coming. While I love watching my girls grow up, it just passes too quickly.
My girls know that Easter is coming. They are excited about it and are anticipating it. I think this is the first year that they have been aware enough to really look forward to something. It will be a good year I think. Since we moved here to San Antonio, we have met a lot of friendly people and our new neighborhood has loads of young families like us. Frankly, it has been wonderful and we are loving the sunshine here too.
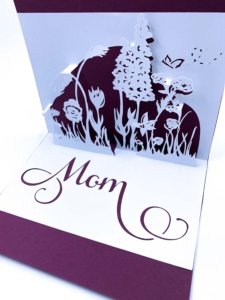
While I know many of you are here for this wonderful freebie, I would like to let you know that I have started adding a few of my SVG files up for sale on Etsy. I have begun listing the files that take me several days or more to design and perfect up on Etsy, but I don’t plan on neglecting the freebie selection I offer here on my website.
Above is a link to my latest Etsy file. I am super excited about it as I created it from my own sketch and am very pleased with how it turned out. If you need a quick and easy Mother’s Day Card, Wedding Card, or Birthday Card I really recommend it. I used it for my Mother’s birthday card and it turned out wonderful! I love cards that are beautiful but the machine does the bulk of the work. Just cut it out, weed it, and attach it to some card stock!
Easter Place Card Cutting Files
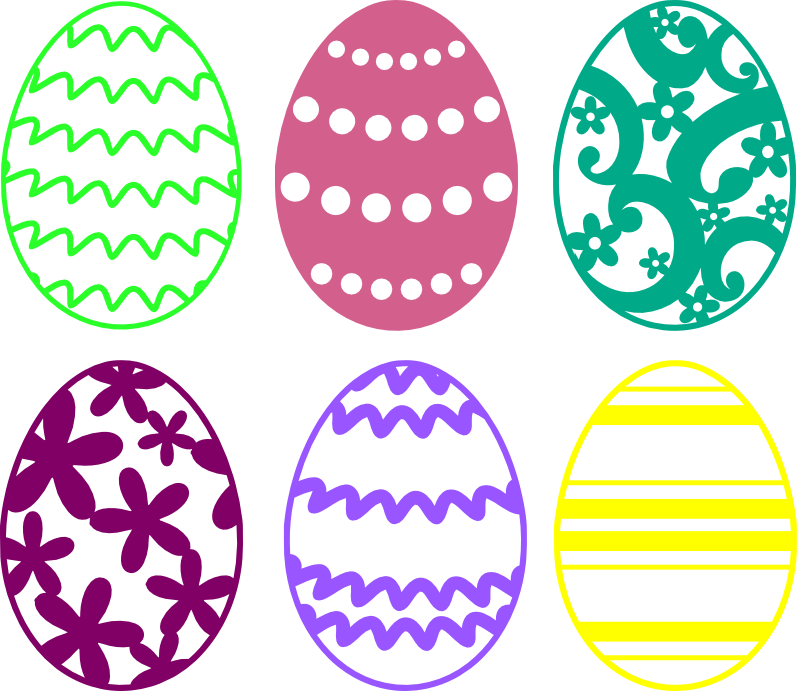
Anyhow, you probably didn’t stop by just for me to reflect on the quickly passing moments. In fact, you probably would like a free Easter file! Well, I have a treat for you. I have created some really fun, cute Easter place cards. I don’t know how many people throw fancy dinner parties or Easter brunches anymore, but if you do, these would look fantastic for your event. Even if you are just having a casual potluck, these would look adorable as labels on the serving table. Whatever you use them for, I hope you enjoy!
Also, while you are here, make sure you stop by and get my other Easter SVG freebies. I have the eggs shown above and some beautiful Easter crosses, both of which I have incorporated into these cute Easter Place Cards.
Note, these SVG files are not your typical outline cutting files. They each have what is called an “open path” – a path that doesn’t form a closed shape. This allows the top of each design to pop up when you fold the card down the middle.
As usual, I made these files quickly in Adobe Illustrator, and highly recommend their Creative Cloud program if you can afford it. If you are a teacher or homeschooling parent you can get it at a great discount too!
Let me know if you run into any trouble with the files. I was able to fit 6 on a standard printer sized sheet of cardstock. My test cuts came out well and I hope your do too! I cut the rectangles out at 4 inches tall by 3.5 inches wide to give a final place card size of 2 inches by 3.5 inches.
Have a wonderful Easter and enjoy some Spring sunshine!
How rare is a four leaf clover? Apparently, there is one four leaf clover for every 10,000 three leaf clovers. That is, according to my random Better Homes & Gardens source. So, that is a 0.01% chance of any given clover having four leaves. Better odds than winning the lottery, but really pretty rare.
seamróg means simply “little plant” or “young plant”
– Wikipedia
Also
of note, apparently the word shamrock only refers to clovers with three leaves.
I did not know this until today. You are welcome for that very important
tidbit. The word comes from an Irish word that means “little plant”.
Now you know.
Saint Patrick’s Day Traditions
What clover related St. Patrick’s day traditions do you have?
Growing up, we didn’t do much. We wore green to avoid getting pinched and would sometimes visit an Irish restaurant for lunch. Other than that, it isn’t a holiday I get overly involved with.
However,
the clovers are cute and green is a great color. So, what are you waiting for?
Download this cute clover file and get crafting!
Paper Four Leaf Clover
And let me leave you with a quick tip for your paper crafting adventures. When I went to cut this clover out from my original post, I really wanted to pep it up a bit with a quick background clover.
So how do you quickly make a nice little background? It is easy with the offset tool. I know that Inkscape, Adobe Illustrator, and Silhouette studio have this handy tool, so I assume that Cricut users must too or they would be missing out on the party.
Simply click the shape (the clover in my case), and hit offset.
The default leaves a pretty wide border, so I typically make it a lot smaller. Then, if you have any bits inside the offset, you can simply ungroup and delete those extra bits. This will depend on whether your shape is a compound shape and what editing program you are using. In Silhouette Studio, it was one step with no extra bits. In Adobe Illustrator I had to delete some things. Sometimes you will need to “release the compound path” and then delete the extra bits. Often, I move the outline that I want out of the way to make deleting the extra bits easier. Lastly, put your offset under your original shape and voila – a nice layered shape! See, I knew you could do it!
If that didn’t do it for you, I made it even simpler. Here is the clover background shape to go with the clover in my original post. Now you have no excuses left. So, go forth and make a wonderful card.
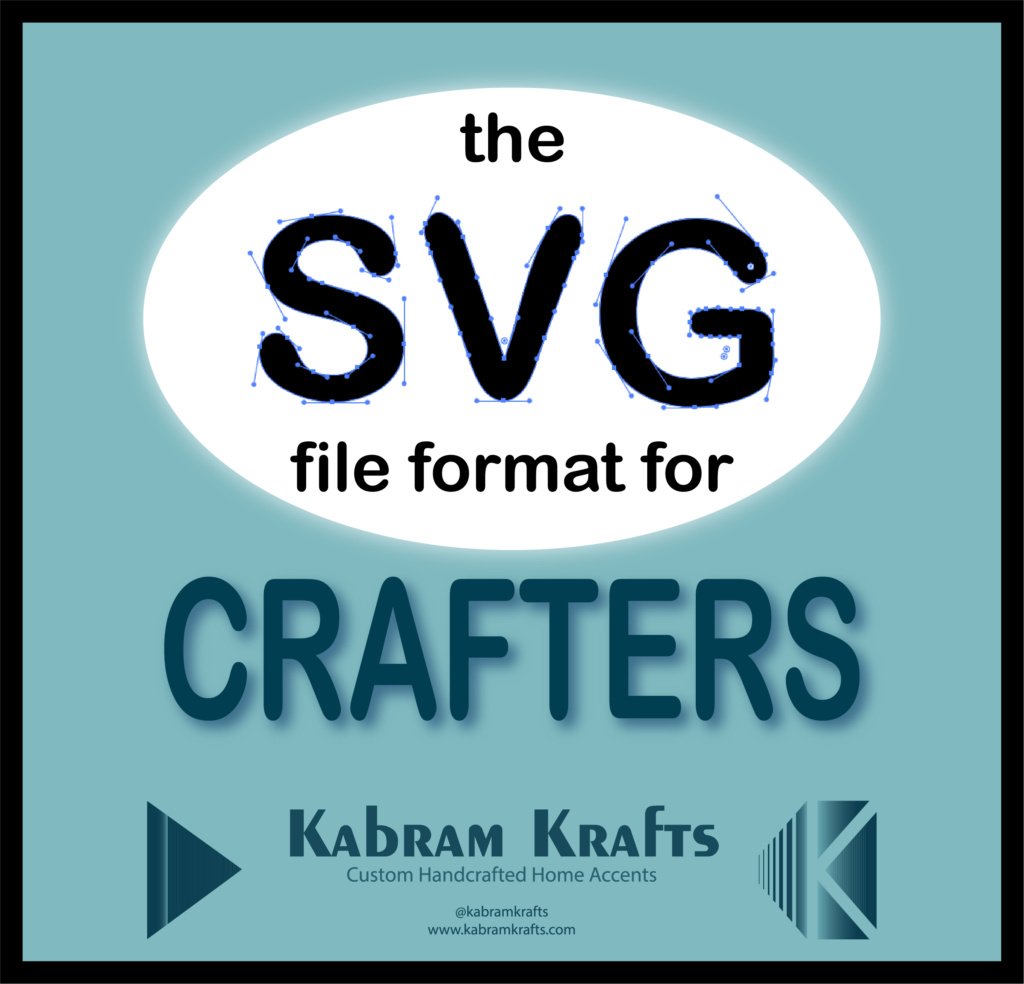
YOU definitely can manipulate an SVG shape. It may look complicated, but it doesn’t take long to get the hang of it. If you want an introduction to the SVG file format and why it is so fantastic, check out the first part of this series: SVG file format for Crafters.
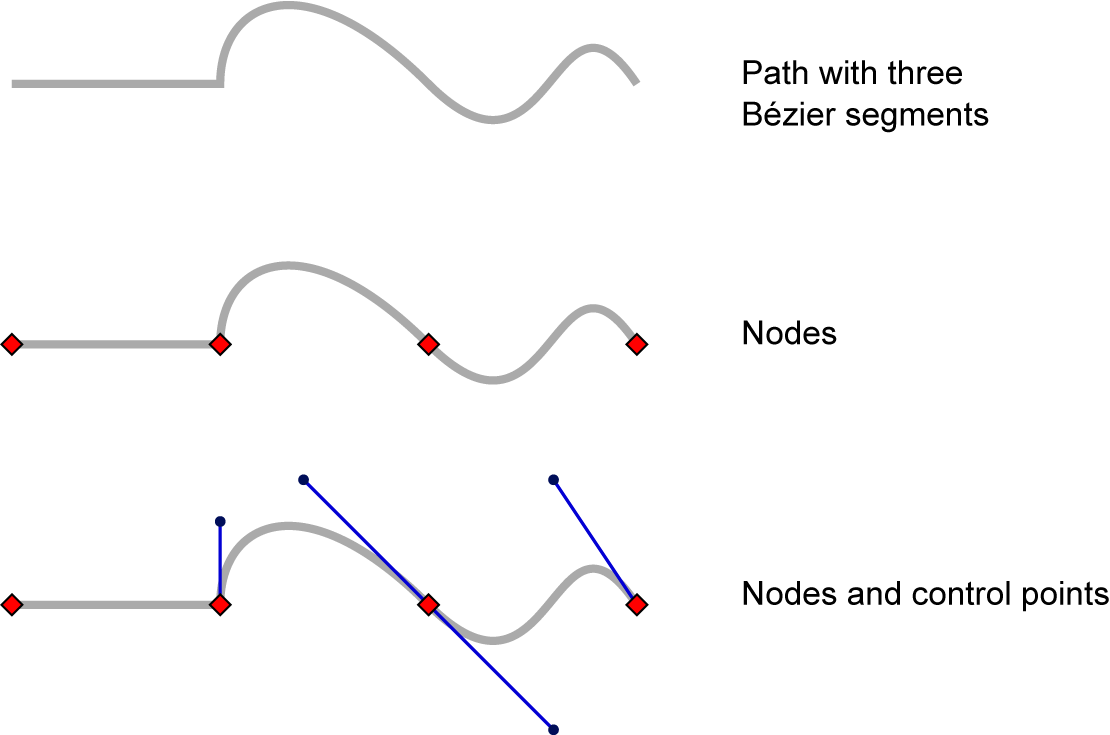
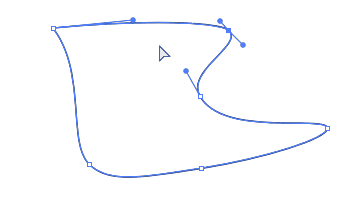
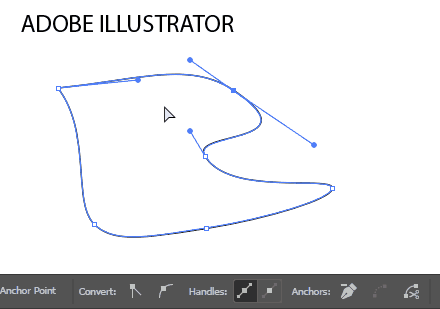
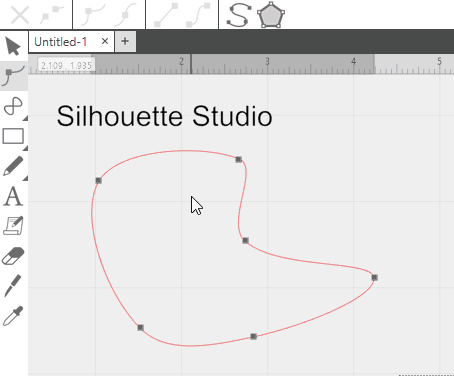
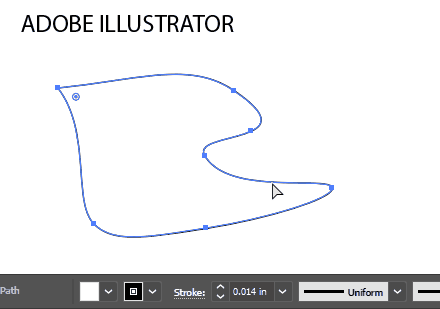
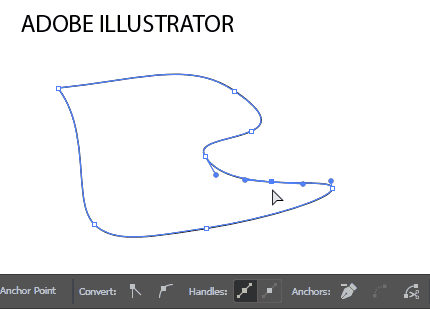
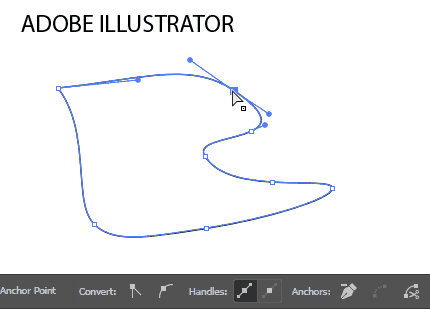
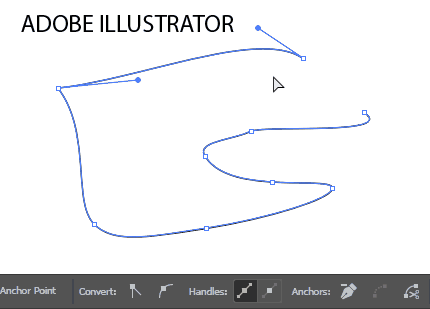
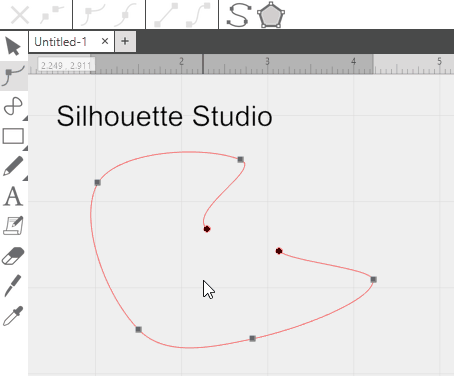
When you first try to edit an SVG, it may seem like a very strange object. Unlike your typical image editor on the computer, the svg files are not all about pixels but about points and angles. Each point and the way it is connected to the other points is recorded in the definition of the file. Each of these points is called a node and each node has one or more handles.
What is a NODE?
So, what is a node? I am so glad you asked. I was just dying to explain it!
Wink, wink…
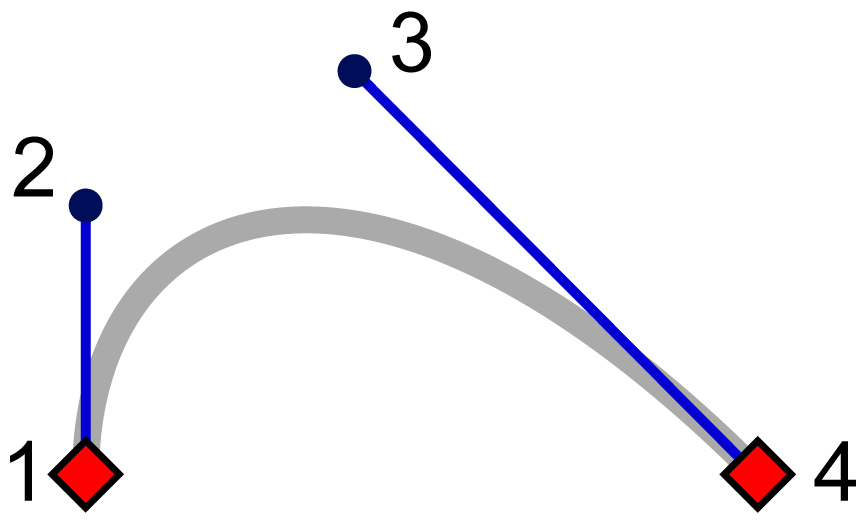
A node is a point on the plane that contains your SVG shape. Many nodes make up each shape. The way these nodes connect to each other defines the path that creates your SVG shape. Each node can have two “handles” on it extending to their own points in the plane. These handles define the slope of the curve of the path for the mathematical equation that generates the lines of the shapes.
This way, instead of storing the pixels of a line, the data is stored in a discrete number of points which your computer can use to compute the lines and structure of the shape. We could go into more math here if you would like (I do have a mathematics degree after all) but I have a feeling the majority of my readers would prefer some practical information for editing the SVG files they have. But, if I am wrong just let me know, I would be happy to let my inner nerd shine out.
This manner of storing information is what makes the SVG file format stand out. It doesn’t matter how big you make it. It will always look sharp.
First, we see the SVG path without any markup. Second, if you go in to edit the SVG path, you will see the nodes. Lastly, if you click to edit the nodes, you should see little “handles” with “control points” on the end pop up. These will move the path without moving the nodes. If you like, you can think of the nodes as anchor points for the shape. Here is another illustration for you.
Well, I suppose that may be enough on the terminology of the SVG format.
You are probably asking me how can I actually DO anything to edit these SVG paths?
Shaping and Editing SVG shapes?
Would you like to edit a design? Do you have a path or a file that you got that just needs a little tweak? Would you like to make and edit your own shapes? You can do it!
Here are 7 operations you may need to use to accomplish your designing goals. Usually, I use Adobe Illustrator and then import my files into Silhouette Studio Designer Edition. I resisted the Designer Edition of Silhouette studio for a long time, but I finally did upgrade. Checkout why in this article:
Why I finally bought the Designer Edition of Silhouette Studio » Kabram Krafts
However, if you would like to edit your SVGs in Silhouette Studio or in Inkscape(a free SVG editor) I have included little GIFs of what that looks like as well.
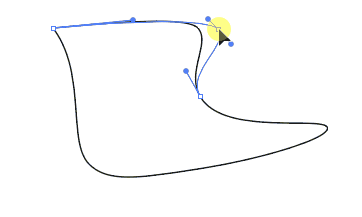
Move an Individual Node (this looks the same in almost any program)
Change the curve of the path between Nodes (this also looks the same in almost any program)
Make a Node either a point or a curve
Add a new Node
Delete a Node
Break a path at a Node
Join a path at two Nodes
Apply it!
Now you know the basics. Congratulations. You can now edit your own files with confidence.
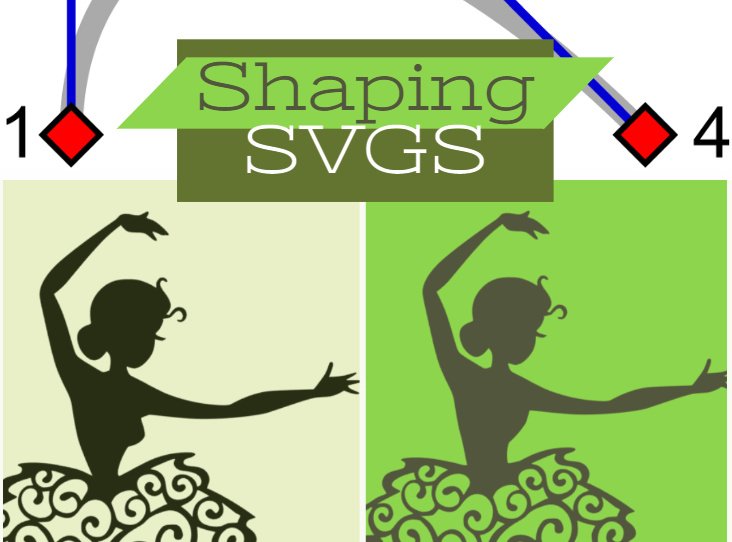
Let’s look at an example.
In this example, my 5 year old had choosen a ballerina she wanted for the shirts we were making with heat transfer vinyl. Well, in my humble opinion, the body shape of the ballerina wasn’t quite appropriate for my 5 year old daughter. A couple of node deletions and moves, and all was fixed. Everyone was happy and no unrealistic body images had been memorialized.
What SVG files have you tried to change? Is there a file you are thinking of right now? Go do it! I know you can. Show me the results!
Kabram Krafts is a participant in the Amazon Services LLC Associates Program, an affiliate advertising program designed to provide a means for sites to earn advertising fees by advertising and linking to amazon.com.


