

Have you ever tried to make your own stencils with your cutting machine? If you have, you know that your design options are limited. No fancy fonts, only stencil fonts. You can’t have any designs that have inner details, or they will not be connected to your finished stencil. Unless you want to hand position each and every element, you have to be very careful in creating or selecting your stencil design.
THE RULE FOR STENCILS
In summary, there can be no inner shapes or details in your finished stencil. If you are having trouble understanding this, think about the letter “O”. If you cut out a stencil for the “O” there will be an outer circle and an inner circle. The inner circle will simply fall out. This is why every stencil font has at least one, usually two connections to the middle of the “O”.

For example, the following is an excellent stencil design. It will cut out easily with no inner parts left to fall out.

On the other hand, this design is not so good:
Then, what if you really want to stencil a more complex image on your card? How can you create more detailed and intricate stencils? You need a stencil that looks impossible, and you need it now! Luckily for you, now you can.
A Stencil Solution
While I am sure I am not the only person to do this, it was a light bulb moment for me. Reflecting on it, I have seen videos of spray paint artists using a series of stencils to make awesome composite pictures. This method is very similar. The idea is to use two stencils instead of one so that you can have details that you can’t get with just one stencil.
Just a note on stencils in general. If you want to make one car with an image like the tools above, you are probably better off just cutting it out of card stock without any hassle converting it to a stencil. However, if you want to put the image on a bunch of things you may want to use a stencil. That way you only have to cut and weed your image once (or twice for these two part stencils) instead of over and over again.
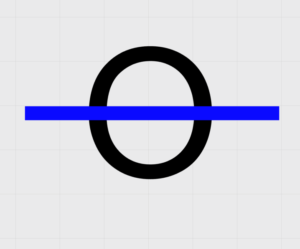
As I outline my solution, I will illustrate with the letter “O” as a simplified case to demonstrate how it works.
My Method
-
- First, open up your image in your editing software. Typically, I open mine in Adobe Illustrator. If you don’t have access to this, Silhouette Studio, Inkscape, or Cricuit Design Space should work just fine. Here, I will illustrate with Silhouette Studio.

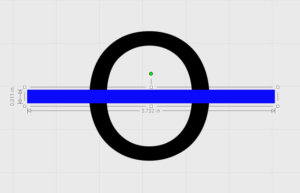
- Create a thin rectangle in a contrasting color to your design and place it over your image.
- Select both your design and the rectangle.
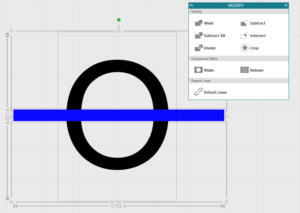
- Copy and paste the two objects. Keep them in the same relative position.

- Open the modify panel (or the tools to modify paths if you are working with another software). Working on just the first copy with both the “O” and the rectangle selected, Click “Subtract”.
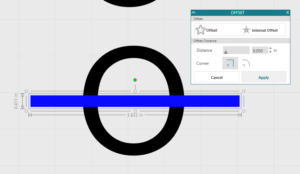
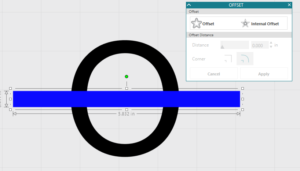
- Now, select just the rectangle on the second copy of your design. Be careful not to move it out of place.
- Open the offset Panel. We need to enlarge it just slightly to ensure a little wiggle room in our finished stencil. Create an offset. This is something you will have to judge for yourself. I used a distance of .05 inches and square corners.
- Select both rectangles and weld them together. You should now have a rectangle that is just slightly bigger than the original one.
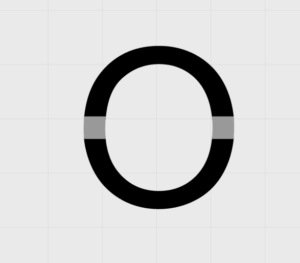
- Select both the rectangle and the copy of the “O”, which should still be in the same relative position. Using the Modify Panel, click “Intersect”. NOTE: If, like me, you have the whole thing disappear when you click “Intersect”, it is likely that one or both of your images are not paths. Select them, click “Object -> Convert To Path” and then try the previous step again. If you got it right, it should look something like this:

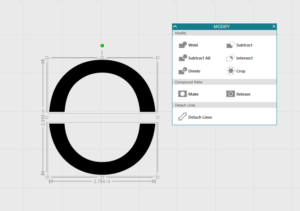
- Select these pieces, right click, and hit “Make Compound path”. Do this to the original pieces of the “O” as well. Here are your two paths now:
- Change the color and overlap them if you want to see what the finished stencil will look like.
- Cut your finished pieces out on separate stencils. Then use one stencil followed by the other to create an “O” with no lines through it!
Going Further
While the “O” was a very simple case, this method can be expanded to more complicated images. In theory, it could even have many more than two stencils to make the finished image, although I have not tried it.
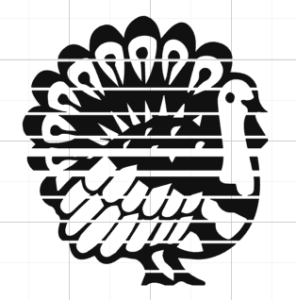
Here is an example of a turkey that I have made into a two part stencil using an extrapolation of the method I outlined above. The key is creating enough rectangles to overlap any inner parts, there should be no islands in your finished stencils!


Stencil Time
I have just a few parting remarks about stencils for you. First, there are stencil materials to consider. Both Silhouette and Cricuit make “stencil” blanks and rolls. I have not tried them because I haven’t found their materials to be high quality in the past. Freezer paper (usually found near foil and wax paper) does work fairly well as a stencil for fabric. You can iron it lightly to get the waxy side to adhere, but you have to be careful not to get the stencil too wet with paint or it will bleed through.
However, my favorite and economical stencil material is simply overhead transparency paper. It is thin and flexible and can be reused as long as you are careful. If needed, I spray the back with a light adhesive spray to adhere it to my project. You will want to play around with your cut settings, but once you get them set it cuts really well.
- First, open up your image in your editing software. Typically, I open mine in Adobe Illustrator. If you don’t have access to this, Silhouette Studio, Inkscape, or Cricuit Design Space should work just fine. Here, I will illustrate with Silhouette Studio.