My project is finally complete! It started as an idea while I was browsing the local thrift store. I had found, much to my husband’s dismay, a set of very awesome looking white cabinets for a total of about $20. Hmmm…those would make an awesome place to store my craft supplies and make a giant craft table too. So, with some moving help from my husband, I became the proud owner of 4 matching white cabinets. There were two with drawers, and two with doors.
It took a little TLC as these cabinets looked like they had been sitting out in a garage or some such place for quite some time, but nothing a little scrubbing and elbow grease couldn’t handle.
I then began to plan out the top. After measuring, I discovered that having two cabinets on each end got me almost exactly to 48″ – the same as the width of a standard melamine board.
Next, I was off to the lumber store:
– 4′ x 8′ sheet of 3/4″ melamine board ($40)
– 25′ of iron on melamine edging ($8)
– Delivery ($20 – no truck, boo hoo…)
– And, for good measure, 2 rolls of non-slip shelf liner ($2)
TOTAL COST: $90
Now, for the construction:
- Place all the cabinets in the desired spot – 2 on each end in my case. Basically, you just need to be sure that the top is well supported. My cabinets were the perfect width when placed two on each end, so it worked out very nicely.
- Place something in the center for a little added support (if needed) – I used a couple wooden shelves I had laying around, with a few boards on top to even out the height. I may have been able to do without this, but I wanted to be sure that the top could support my weightier hobbies like sewing!
- Now, because I wanted the top to be removable, I had to devise a way to prevent shifting without using screws or nails. So, I used some of the foam like shelf liner. Cut the shelf liner to fit on top of the cabinets and hot glue it on. I also placed some between the boards in the center to keep them in place as well.
- Put the top on! Not a hard step if you have some extra hands. Just make sure you get the top centered on your supports!
- Iron on the edging. The edging came with directions, so just follow those. I also used a rubber stamp roller to ensure that it was well adhered.
- Trim the edging down to size. My edging was 7/8″, so I had to cut a bit off with an exacto knife. This proved a little tricky, so be careful. I think I took a little more of the melamine top off in places, but since it wasn’t perfect to start, I wasn’t too upset. I will probably work on touching up the edge when I get a chance.
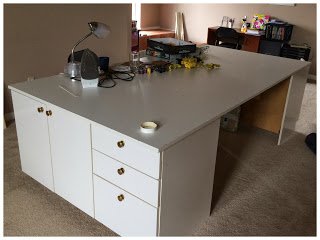
- Admire the finished table and start crafting!